# Introduction
AlmaLinux has several key components geared toward security and privacy. Although permissions and ownership tend to get the most attention in that regard, user and group management is just another piece of the puzzle.
Of course, user and group management isn't only about security, as it's also there to help make the management of assets on your Linux machines even easier. And given that Linux is a multi-user environment, having the tools to properly manage those users and groups is a must.
Fortunately, the open-source operating system has everything you need built right in.
# Fundamental Concepts
Users and groups can be managed in two ways:
- The command line interface (CLI)
- The desktop graphical user interface (GUI)
Which option you use will depend on the access you have to the machine in question and whether or not you prefer the terminal or a GUI.
# Key Takeaways
# Managing users from the command line
The first thing to deal with is user management and we'll start with the command line. Let's say that you need to create a new user and you're doing so after logging into your AlmaLinux server via SSH.
The process of creating a user is simple. Once you've logged into the server, issue the command:
sudo adduser USERNAME
WARNING
In this article we use all-caps to indicate something that should be considered a variable - something you should be changing. Usernames, groups, and the like should always be only lowercase, for long term compatibility reasons.
In this case, USERNAME is the user you want to add. The adduser command functions differently on various distributions, but on AlmaLinux you at least have to set a password for the user (otherwise they can't log in). To do that, issue the command:
sudo passwd -e USERNAME
Where USERNAME is the name of the new user.
The -e option is used to automatically expire a user's password. This way, the first time a user logs in, they can set their password. If you don't do this, it means you (or the admin who took care of the task) will know that user's password and that's not either secure or private.
There are other tasks you can undertake to manage users from the command line, such as:
- Lock a user account -
sudo passwd -l USERNAME - Unlock a user account -
sudo passwd -u USERNAME - Delete a user account -
sudo userdel USERNAME - Delete a user and their home directory -
sudo userdel -r USERNAME
# Managing users from the GUI
If you prefer a GUI, you're in luck, as AlmaLinux has the tools you need to make managing users simple.
To access this feature, open Settings and click Users in the left sidebar. On this page, you first must Unlock the settings by clicking Unlock (Figure 1) and then typing your sudo password.

You should see all of your current users listed here.
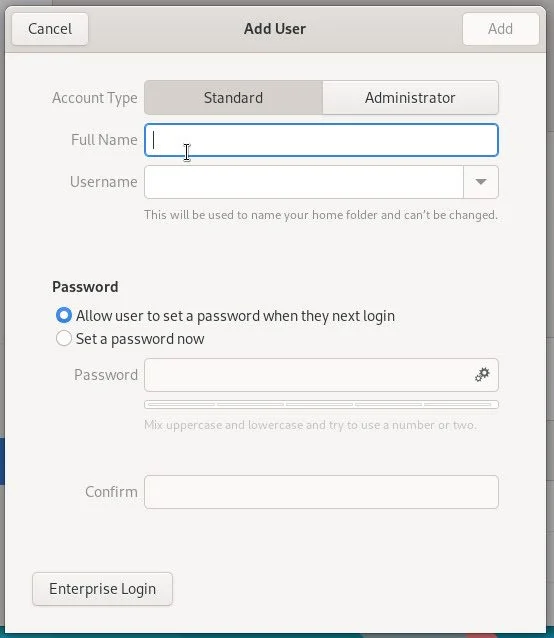
Once you've done that, click Add User and then, in the resulting pop-up (Figure 2), fill out the user information.
If you go this route, you'll want to use the passwd -e command to expire the user's password, so they can set a new one when they next log in.
If the new user is to be an administrator, make sure to first click the Administrator tab before adding the information. After completing this, click Add and your user is ready.
The one caveat to this process is that you can't manage groups via the GUI and you can't expire their password. Because of this, you'll still need to use the command line to finish up.
# Managing groups from the command line
Groups are a very powerful feature that makes it possible to more easily control who has access to what files and folders. For example, you could have a group called developers that has access to the /dev folder. Any member of that group would have access to the folder and, at any time, you could remove a member from the group to prevent them from accessing those resources.
That's far easier than trying to manage access to files and folders on a case-by-case basis.
To add a new group, the command is:
sudo groupadd GROUPNAME
Where GROUPNAME is the name of the group to be added.
Next, you'll want to add users to the group, which is done with the usermod command like so:
sudo usermod -aG GROUPNAME USERNAME
Where GROUPNAME is the name of the group in question and USERNAME is the name of the user to be added to the group. The option a is for append and G is for group.
Here's a handy trick. You can create a new user and add the user to the required group(s) with a single command. Let's say you want to add the user nathan with a primary group users and secondary groups wheel, developers, admins, and staff. The command for this would be:
sudo useradd -g users -G wheel,developers,admins,staff nathan
It's important that there are no spaces between group names.
If you want to remove a user from a group, the command would be:
usermod -rG GROUPNAME USERNAME
Where GROUPNAME is the group to be removed and USERNAME is the username.
Remember, any time you create a new user, you should immediately expire their password, so the user can set one themselves.
And that's the basics of user and group management in Linux. There's a lot more to learn, so we would recommend viewing the man pages for each command listed here (such as man adduser, man groupadd, and man usermod).