# After-installation Guide
This guide describes recommended actions to be performed after the AlmaLinux OS installation is completed successfully and rebooted. It also contains some steps for the system's customization.
# Update the system and check for security updates
Run the following command in the terminal to check for all available updates including security updates and install them:
sudo dnf update
# Check for security updates
If you don't want to have all available updates to be installed on your machine, but need to check only for the security updates to ensure that it is up to date and protected against vulnerabilities, run the following command:
sudo dnf --security update
# Configure the network settings
# On a machine with a graphical interface
If your system has a graphical interface, you can an application. On your panel, open Settings via Applications:

or find them under WiFi/Connection sign:
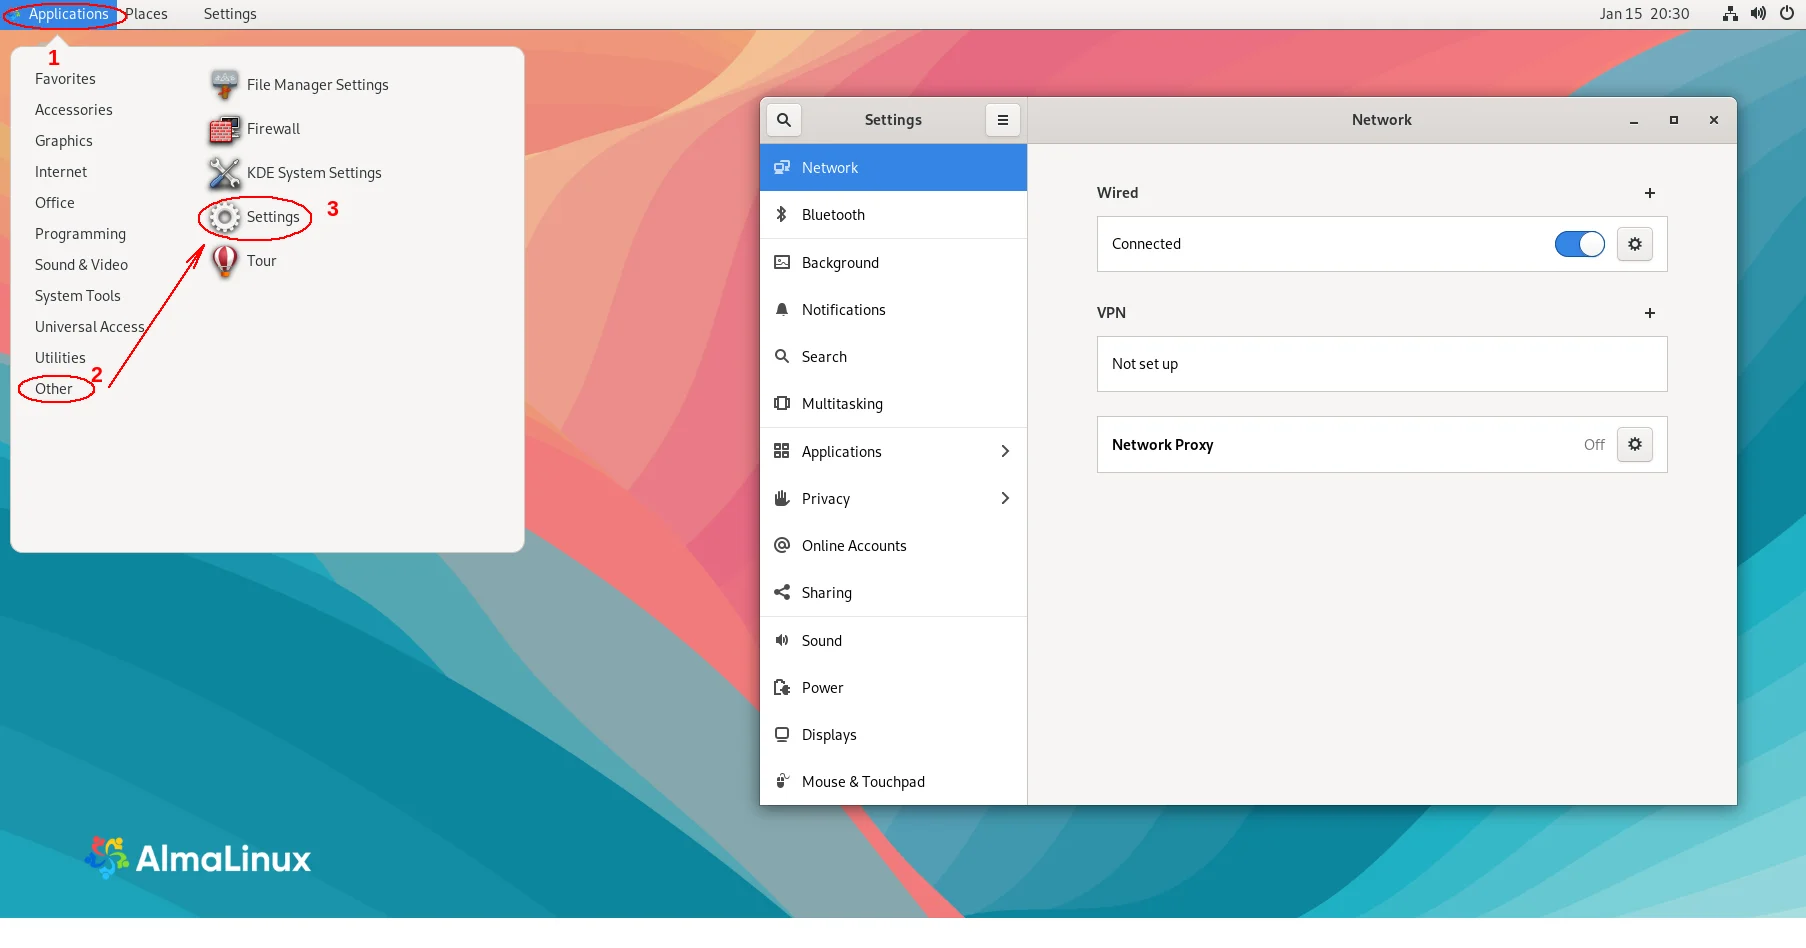
Using this application you can edit an existing connection or configure a new one.
# On a machine without a graphical interface
If your system doesn't have any graphical interface, you can configure network settings using the Network Manager tool - nmtui
Run the following command in the terminal:
nmtui
It will get you to the text user interface tool.
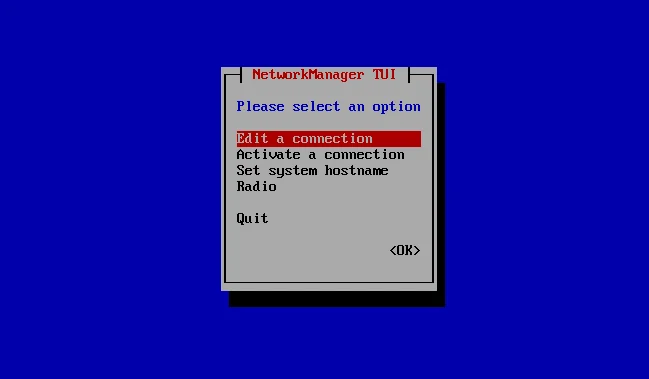
Use the arrow keys to navigate and press Enter to select an option of your choice.
Find more (opens new window) about nmtui tool usage.
# Setting the hostname
To set the hostname on AlmaLinux, you can use either the nmtui tool or run the hostnamectl command in the terminal:
hostnamectl set-hostname [new-hostname] # replace new-hostname with the hostmane to set
Administrative privileges may be required to use this command.
# Enable necessary repositories
First, list repositories that are already enabled on your AlmaLinux machine:
dnf repolist
Then, enable a specific repository. Most AlmaLinux repositories can be enabled with the dnf config-manager --set enabled command.
But note, that CentOS SIGs, Extra (EPEL and ELRepo) and AlmaLinux Synergy repositories are enabled with the dnf install command.
You can check the Repositories page to check all the supported repositories and a particular command on how to enable each of them.
After needed repositories have been enabled, verify the changes:
dnf repolist enabled
TIP
It is recommended to update the repository after enabling it:
sudo dnf update
Updating the repository will ensure that you have access to the latest software packages and security updates available.
# Install NVIDIA or AMD drivers
Depending on your hardware installed, you might need to install NVIDIA or AMD drivers.
# NVIDIA
You can get NVIDIA drivers in different ways:
- Install binary driver
- Compile driver source
- Get them using RPM Fusion:
Enable the RPM Fusion repository by running the command:
For AlmaLinux 8:
sudo dnf install https://mirrors.rpmfusion.org/free/el/rpmfusion-free-release-8.noarch.rpm https://mirrors.rpmfusion.org/nonfree/el/rpmfusion-nonfree-release-8.noarch.rpmFor AlmaLinux 9:
sudo dnf install https://mirrors.rpmfusion.org/free/el/rpmfusion-free-release-9.noarch.rpm https://mirrors.rpmfusion.org/nonfree/el/rpmfusion-nonfree-release-9.noarch.rpmNext, update the repositories:
sudo dnf updateInstall the necessary packages:
sudo dnf install akmod-nvidiaReboot your system to load the new NVIDIA kernel module and complete the installation. You should now have the NVIDIA drivers successfully installed on your AlmaLinux system.
# AMD
To install AMD drivers using RPM Fusion on AlmaLinux, first, enable the RPM Fusion repository by running the following commands:
For AlmaLinux 8:
sudo dnf install https://mirrors.rpmfusion.org/free/el/rpmfusion-free-release-8.noarch.rpm https://mirrors.rpmfusion.org/nonfree/el/rpmfusion-nonfree-release-8.noarch.rpmFor AlmaLinux 9:
sudo dnf install https://mirrors.rpmfusion.org/free/el/rpmfusion-free-release-9.noarch.rpm https://mirrors.rpmfusion.org/nonfree/el/rpmfusion-nonfree-release-9.noarch.rpmNext, update the repositories:
sudo dnf updateInstall the AMD drivers package:
sudo dnf install akmod-amdgpuReboot your system to load the driver.
# Configure firewall settings
To configure firewall settings on AlmaLinux, you can use the built-in firewall management tool - firewalld.
- Install the tool:
sudo dnf install firewalld - Start the firewalld service:
sudo systemctl start firewalld - If needed, enable it to start automatically on boot:
sudo systemctl enable firewalld - Use the
firewall-cmdcommand to define rules and zones for your firewall.
Read more about the tool's usage.
# Desktop Environment
One of the possible customizations to your AlmaLinux system is having a Desktop Environment of your choice. AlmaLinux supports:
- GNOME
- GNOME-Mini
- KDE
- XFCE
- MATE
- Pantheon for AlmaLinux 9
Some AlmaLinux images already have GNOME and GNOME-Mini desktop environments installed.
To install GNOME, KDE, and XFCE desktop environments:
First, enable EPEL and PowerTools/CRB repositories, by running the following commands:
For AlmaLinux 8:
sudo dnf config-manager --set-enabled powertools
sudo dnf install epel-release
For AlmaLinux 9:
sudo dnf config-manager --set-enabled crb
sudo dnf install epel-release
List available available package groups:
sudo dnf group listAn example output you may see:
Available Environment Groups:
  Server with GUI # GNOME Desktop Environment
  Server
  Workstation # GNOME Desktop Environment
  KDE Plasma Workspaces # KDE Desktop Environment
  Virtualization Host
  Custom Operating System
  ...
Available Groups:
  ...
  Xfce # XFCE Desktop Environment
Install a package group of your choice:
- GNOME - you can install one of the "Server with GUI" or "Workstation" options to get the GNOME Desktop Environment. Check the list of packages to define which option fits your needs better:Install the preferred one:
dnf group info "Server with GUI" # to list packages of Server with GUI group dnf group info "Workstation" # to list packages of Workstation groupsudo dnf groupinstall "Server with GUI" # install Server with GUI group of packages sudo dnf groupinstall "Workstation" # install Workstation group of packages - KDE
sudo dnf groupinstall "KDE Plasma Workspaces" - XFCE
sudo dnf groupinstall "Xfce"
- GNOME - you can install one of the "Server with GUI" or "Workstation" options to get the GNOME Desktop Environment. Check the list of packages to define which option fits your needs better:
To install Pantheon for AlmaLinux 9:
- Enable EPEL, PowerTools and Synergy repositories
- Install Pantheon Desktop Environment:
sudo dnf groupinstall "Pantheon Desktop"
To have an AlmaLinux system with GNOME-Mini or MATE desktop environments we recommend installing AlmaLinux OS from the corresponding Live Media image.
# Reboot
Reboot your AlmaLinux OS machine to apply all the changes:
reboot
# Live Media options
If you are not sure whether AlmaLinux fits your needs, you can try it before installing it. AlmaLinux has various Live Media options for this purpose. You can get the download links from the website (opens new window) and usage guides on the Live Media page.