# AlmaLinux installation guide (ISOs)
This page provides a step-by-step guide to downloading the AlmaLinux ISO image, creating a bootable USB drive, and using it to install AlmaLinux OS.
# Requirements
- System requirements:
- Disk space: 10GB minimum, 20GB recommended
- Minimum 1.5 GB RAM
TIP
More about requirements: Red Hat Enterprise Linux Technology Capabilities and Limits (opens new window).
- A USB flash drive of size 8GB as a minimum, 12GB or more is recommended
# Download AlmaLinux ISO
AlmaLinux supports the following firmware interfaces and architectures.
Firmware Interfaces:
- BIOS
- UEFI
Architectures:
- Intel/AMD (x86_64)
- ARM64 (aarch64)
- IBM PowerPC (ppc64le)
- IBM Z (s390x)
AlmaLinux has 3 types of ISOs for each supported architecture:
boot- A single network installation CD image that downloads packages over the Internet.minimal- A minimal self-containing DVD image that makes offline installation possible.dvd- A full installation DVD image that contains mostly all AlmaLinux packages.
TIP
There are also latest and update ISO images. Latest provides the latest minor version of the selected major version, like AlmaLinux-9-latest. Update files are ISOs that were rebuilt including some updates.
There are a several ways to download AlmaLinux ISO:
Download AlmaLinux ISO from a mirror. Select the nearest mirror to your geographic location from the list (opens new window). You need the version/isos/arch/ directory to download the suitable ISO.
Download AlmaLinux ISO via Bittorrent, this may be faster than downloading from a mirror based on your geographic location. A .torrent file can be found on all mirrors in the ISO directory.:
Download from the Public Package Repository (opens new window):
- AlmaLinux 8 (opens new window)
- AlmaLinux 9 (opens new window)
- Past point releases and beta versions can be found in the Vault (opens new window)
Run the
curlcommand in the command line:WARNING
This command example is for downloading the DVD ISO of AlmaLinux 9.1. AlmaLinux ISOs are named using the following convention:
AlmaLinux-major version.minor version-architecture-ISO type.iso
Change the version, architecture and type to the ones you need.
$ curl -O https://repo.almalinux.org/almalinux/9/isos/x86_64/AlmaLinux-9-latest-x86_64-dvd.isoTIP
curlis built-in into current versions of Linux®, macOS and Windows.
# ISO verification
# Linux
Download and import the AlmaLinux public key:
$ curl -O https://repo.almalinux.org/almalinux/RPM-GPG-KEY-AlmaLinux-9
$ gpg --import RPM-GPG-KEY-AlmaLinux-9
Verify the downloaded ISO image checksum:
# download a checksums list
$ curl -O https://repo.almalinux.org/almalinux/9/isos/x86_64/CHECKSUM

# verify the checksums list, we are looking for a “Good signature”
$ gpg --verify CHECKSUM
gpg: Signature made Tue 13 Dec 2022 14:09:50 CET
gpg:                using RSA key BF18AC2876178908D6E71267D36CB86CB86B3716
gpg: Good signature from "AlmaLinux OS 9 <packager@almalinux.org>" [unknown]
gpg: WARNING: This key is not certified with a trusted signature!
gpg:          There is no indication that the signature belongs to the owner.
Primary key fingerprint: BF18 AC28 7617 8908 D6E7  1267 D36C B86C B86B 3716
# calculate the downloaded ISO SHA256 checksum
$ sha256sum AlmaLinux-9-latest-x86_64-dvd.iso
2a44e3f8a012c132da19b9aae2bf949e20b116f0a2a7ac3eca111972f4ac952f  AlmaLinux-9-latest-x86_64-dvd.iso

# compare it with the expected checksum, it should be the same
$ cat CHECKSUM | grep -E 'SHA256.*AlmaLinux-9-latest-x86_64-dvd.iso'
SHA256 (AlmaLinux-9-latest-x86_64-dvd.iso) = 2a44e3f8a012c132da19b9aae2bf949e20b116f0a2a7ac3eca111972f4ac952f
# macOS
# calculate the downloaded ISO SHA256 checksum
$ shasum -a 256 AlmaLinux-9-latest-x86_64-dvd.iso
2a44e3f8a012c132da19b9aae2bf949e20b116f0a2a7ac3eca111972f4ac952f  AlmaLinux-9-latest-x86_64-dvd.iso

# download the CHECKSUM file
curl -O https://repo.almalinux.org/almalinux/9/isos/x86_64/CHECKSUM

# compare it with the expected checksum, it should be the same
$ cat CHECKSUM | grep -E 'SHA256.*AlmaLinux-9-latest-x86_64-dvd.iso'
SHA256 (AlmaLinux-9-latest-x86_64-dvd.iso) = 2a44e3f8a012c132da19b9aae2bf949e20b116f0a2a7ac3eca111972f4ac952f
# Windows
C:\> certUtil -hashfile C:\AlmaLinux-9-latest-x86_64-dvd.iso SHA256
SHA256 hash of AlmaLinux-9-latest-x86_64-dvd.iso:
2a44e3f8a012c132da19b9aae2bf949e20b116f0a2a7ac3eca111972f4ac952f
CertUtil: -hashfile command completed successfully.

# download the CHECKSUM file
C:\> curl -O https://repo.almalinux.org/almalinux/9/isos/x86_64/CHECKSUM

# compare it with the expected checksum, it should be the same
C:\> findstr /i /r /c:"SHA256.*AlmaLinux-9-latest-x86_64-dvd.iso" CHECKSUM
SHA256 (AlmaLinux-9-latest-x86_64-dvd.iso) = 2a44e3f8a012c132da19b9aae2bf949e20b116f0a2a7ac3eca111972f4ac952f
# Create USB installation media
# Linux
# dd
Use the dd command on any Linux distribution.
Insert your target USB and locate it. There are several ways to do this, some examples are shown below:
sudo fdisk -l- this command shows the connected block storage devices, including the USB devices.lsblk- this command shows all the available block storage devices, including the USB block storage devices.sudo blkid- this command shows the same information aslsblk, but root privileges are required to execute.
You need to look for /dev/sda or /dev/sdb or /dev/sdc, which is your target USB.
After locating your target USB device, navigate to the location of your source ISO. Run the dd command to write files from ISO to USB:
sudo dd if=./AlmaLinux-9-latest-x86_64-dvd.iso of=/dev/sdX status=progress conv=fsync bs=4M
dd: Start the dd command to write the DVD/CD iso image.if=AlmaLinux-9-latest-x86_64-dvd.iso: path to the input file.of=/dev/sdX: path to destination USB disk/stick (you need to replace 'X').status=progress: display a progress bar while writing the image to the USB stick.conv=fsync: make sure to finish the writing before returning.bs=4M: use blocks of 4 megabytes instead of the default 512 bytes.
WARNING
This example is for AlmaLinux 9. Replace the version with the one you need to work with other AlmaLinux images.
# Fedora Media Writer
Fedora Media Writer is a GUI based application for creating USB installation media from ISO images. It is available on Flathub for installation on linux. Use either your distributions software packaging application or install via the CLI with flatpak.
Install:
flatpak install flathub org.fedoraproject.MediaWriterRun:
flatpak run org.fedoraproject.MediaWriter
# Windows
# Fedora Media Writer
Fedora Media Writer is a GUI based application for creating USB installation media from ISO images. It is available for installation on Windows from the Github repository (opens new window), download the latest installer from the Releases (opens new window) and install.
# Rufus
Rufus is a helpful free and open-source application - Rufus (opens new window).
Open the application, choose your target USB, and ISO you need to burn, and press start.
# macOS
# Fedora Media Writer
Fedora Media Writer is a GUI based application for creating USB installation media from ISO images. It is available for installation on MacOS from the Github repository (opens new window), download the latest DMG from the Releases (opens new window) and install.
# dd
You can also use dd from the CLI:
sudo dd if=./AlmaLinux-9-latest-x86_64-dvd.iso of=/dev/diskXXX status=progress conv=fsync bs=4M
TIP
Look at the Linux example above for detailed command elements description for the dd command.
TIP
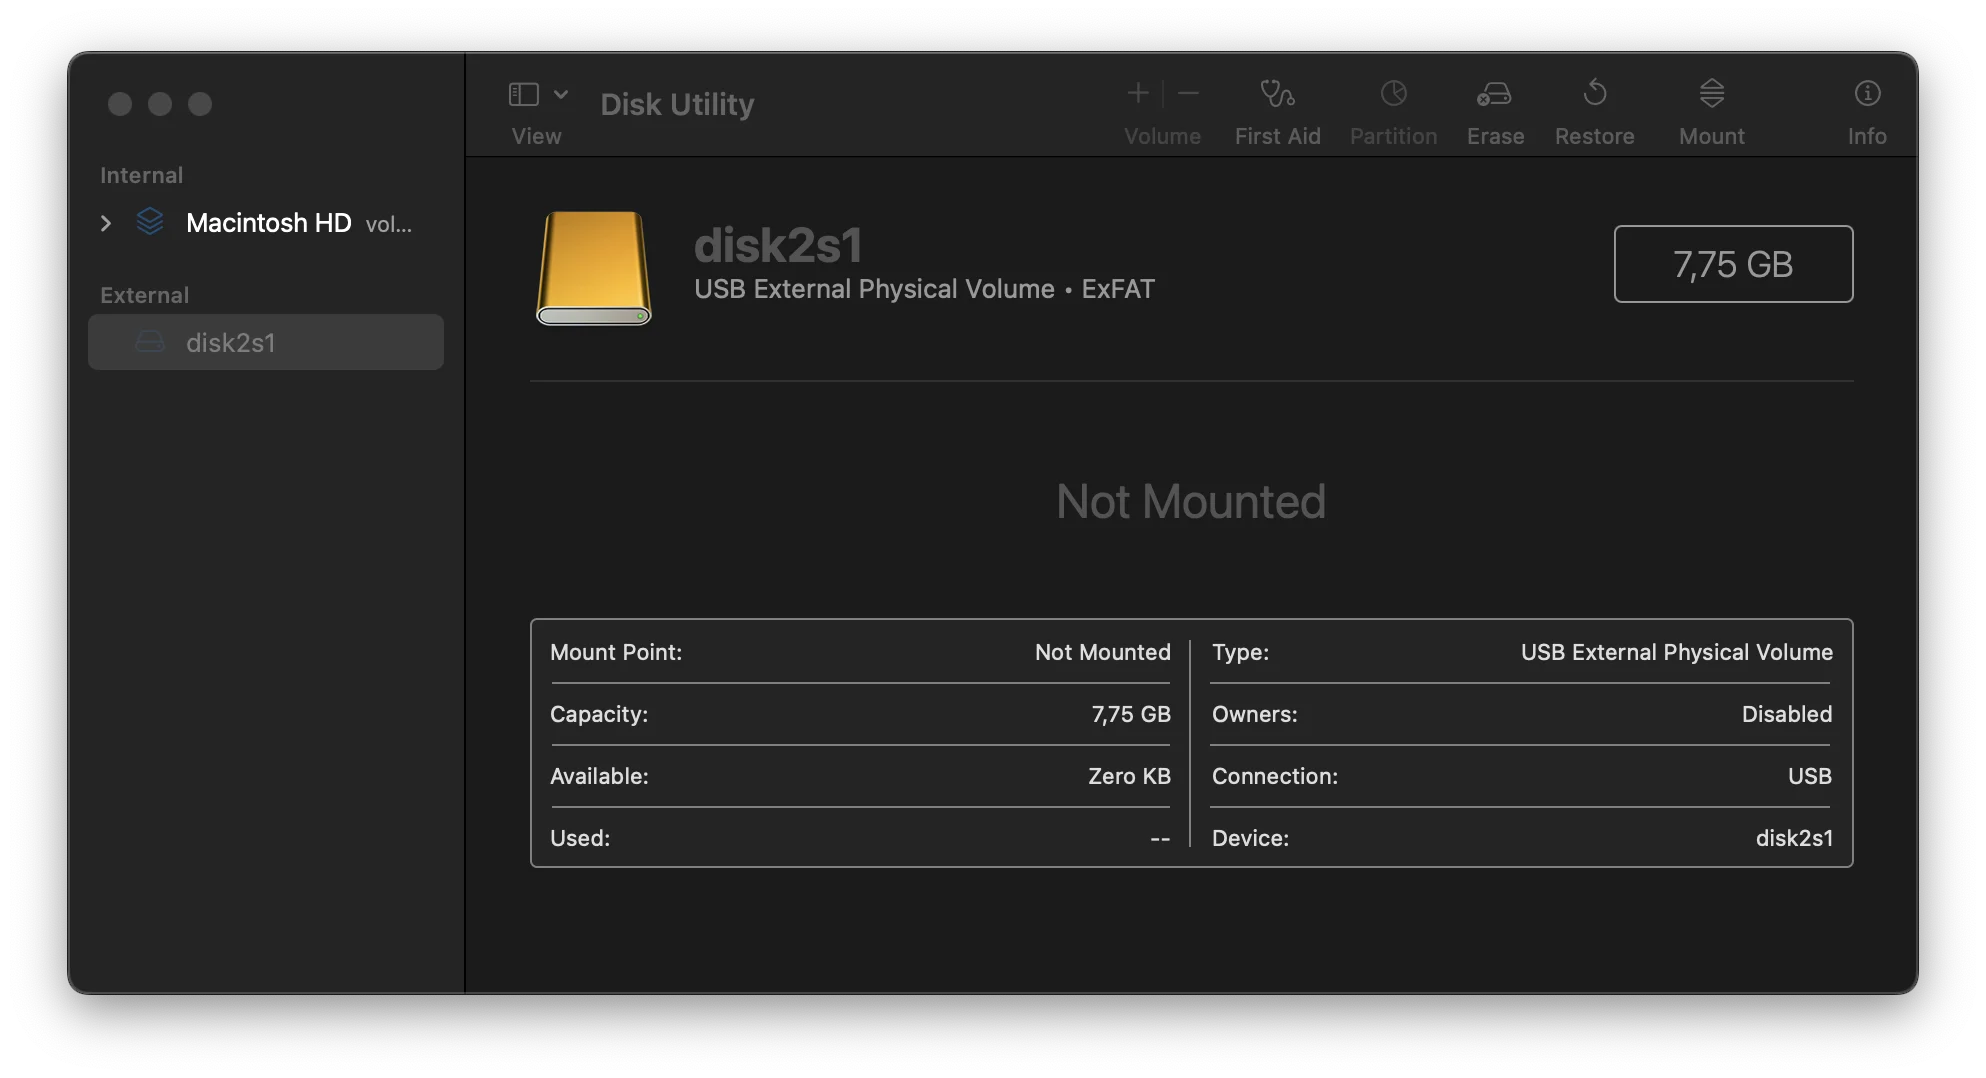
To determine the XXX (on our machine it was disk2s1) open the Disk Utility app.
Choose your USB drive in the External section and check the disk name in the Device field:
Now you have AlmaLinux ready on a USB stick.
# Installation
Insert and boot the USB installation meda and you will be presented with the AlmaLinux welcome menu:

- The recommended option Test this media & install AlmaLinux 9.1 is automatically highlighted. Choosing this option will run the installation media check to verify that it's usable and the installation can continue. After the media check completes successfully, the anaconda installer will start automatically.
TIP
Selecting Install AlmaLinux 9.x. will skip checking the installation media and boot straight to the anaconda installer.
- The recommended option Test this media & install AlmaLinux 9.1 is automatically highlighted. Choosing this option will run the installation media check to verify that it's usable and the installation can continue. After the media check completes successfully, the anaconda installer will start automatically.
When the installer boots, the first step is to choose the language that will be used during the installation process.
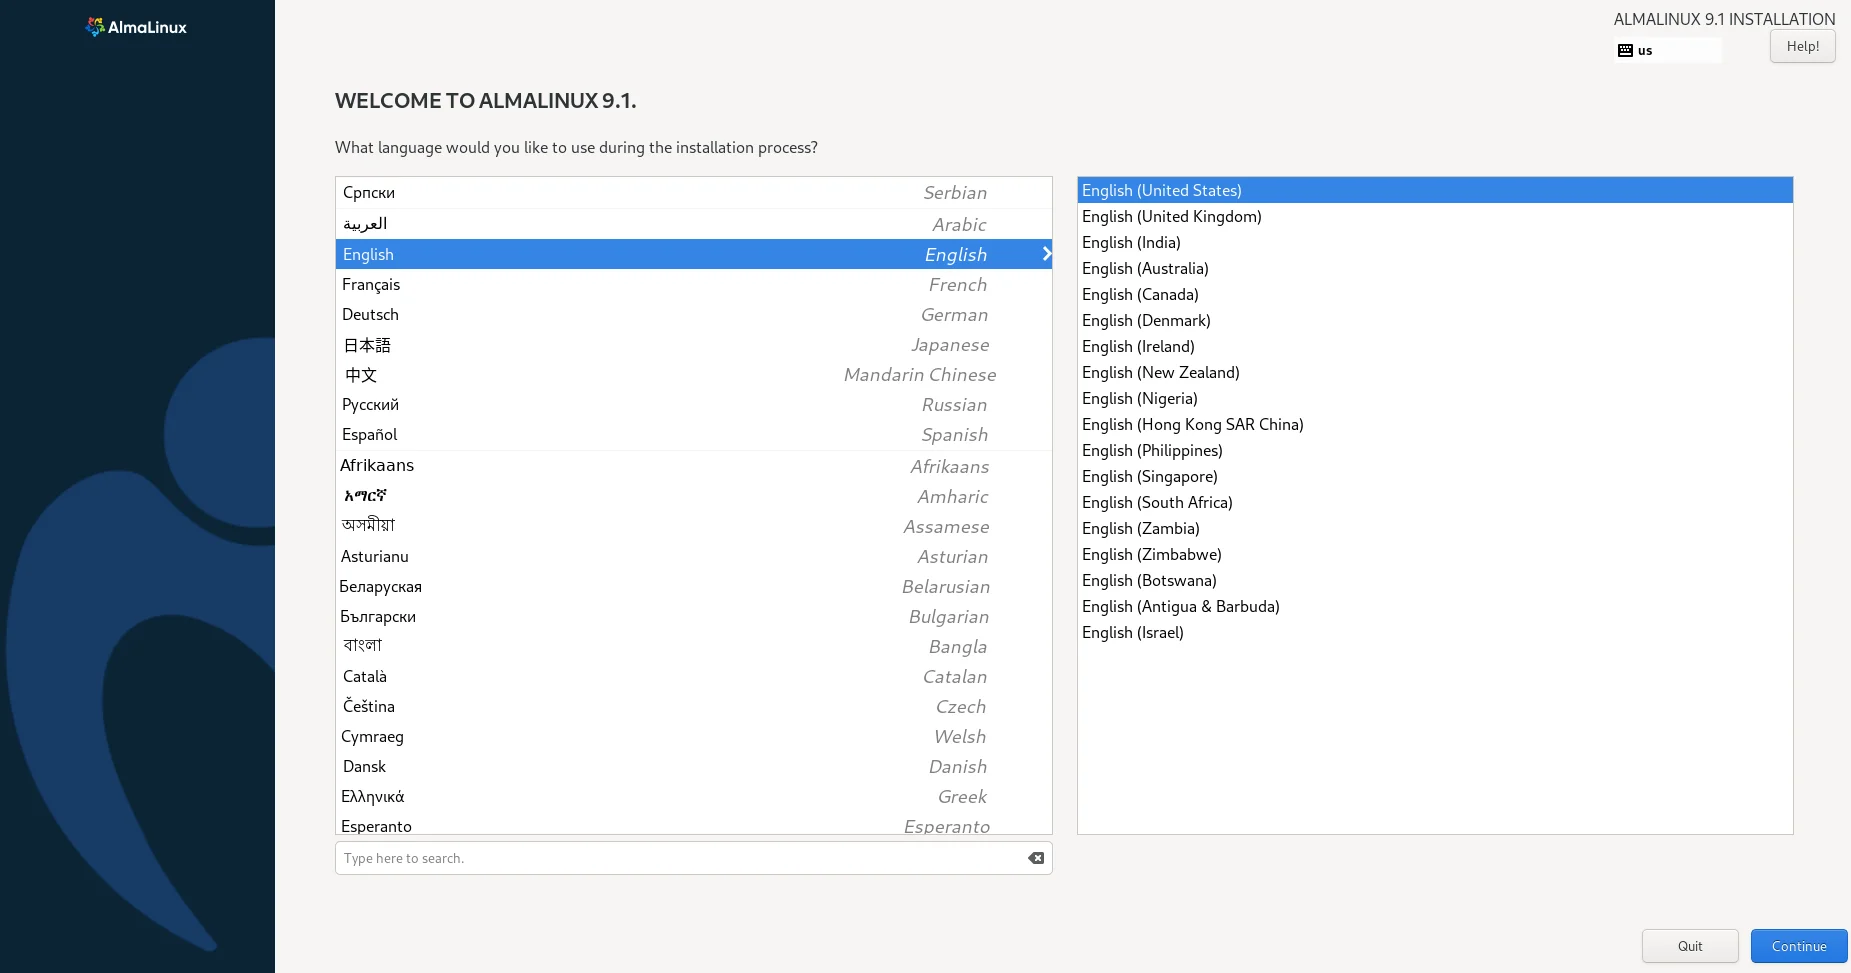
Choose the language you'd like and press the Continue button.
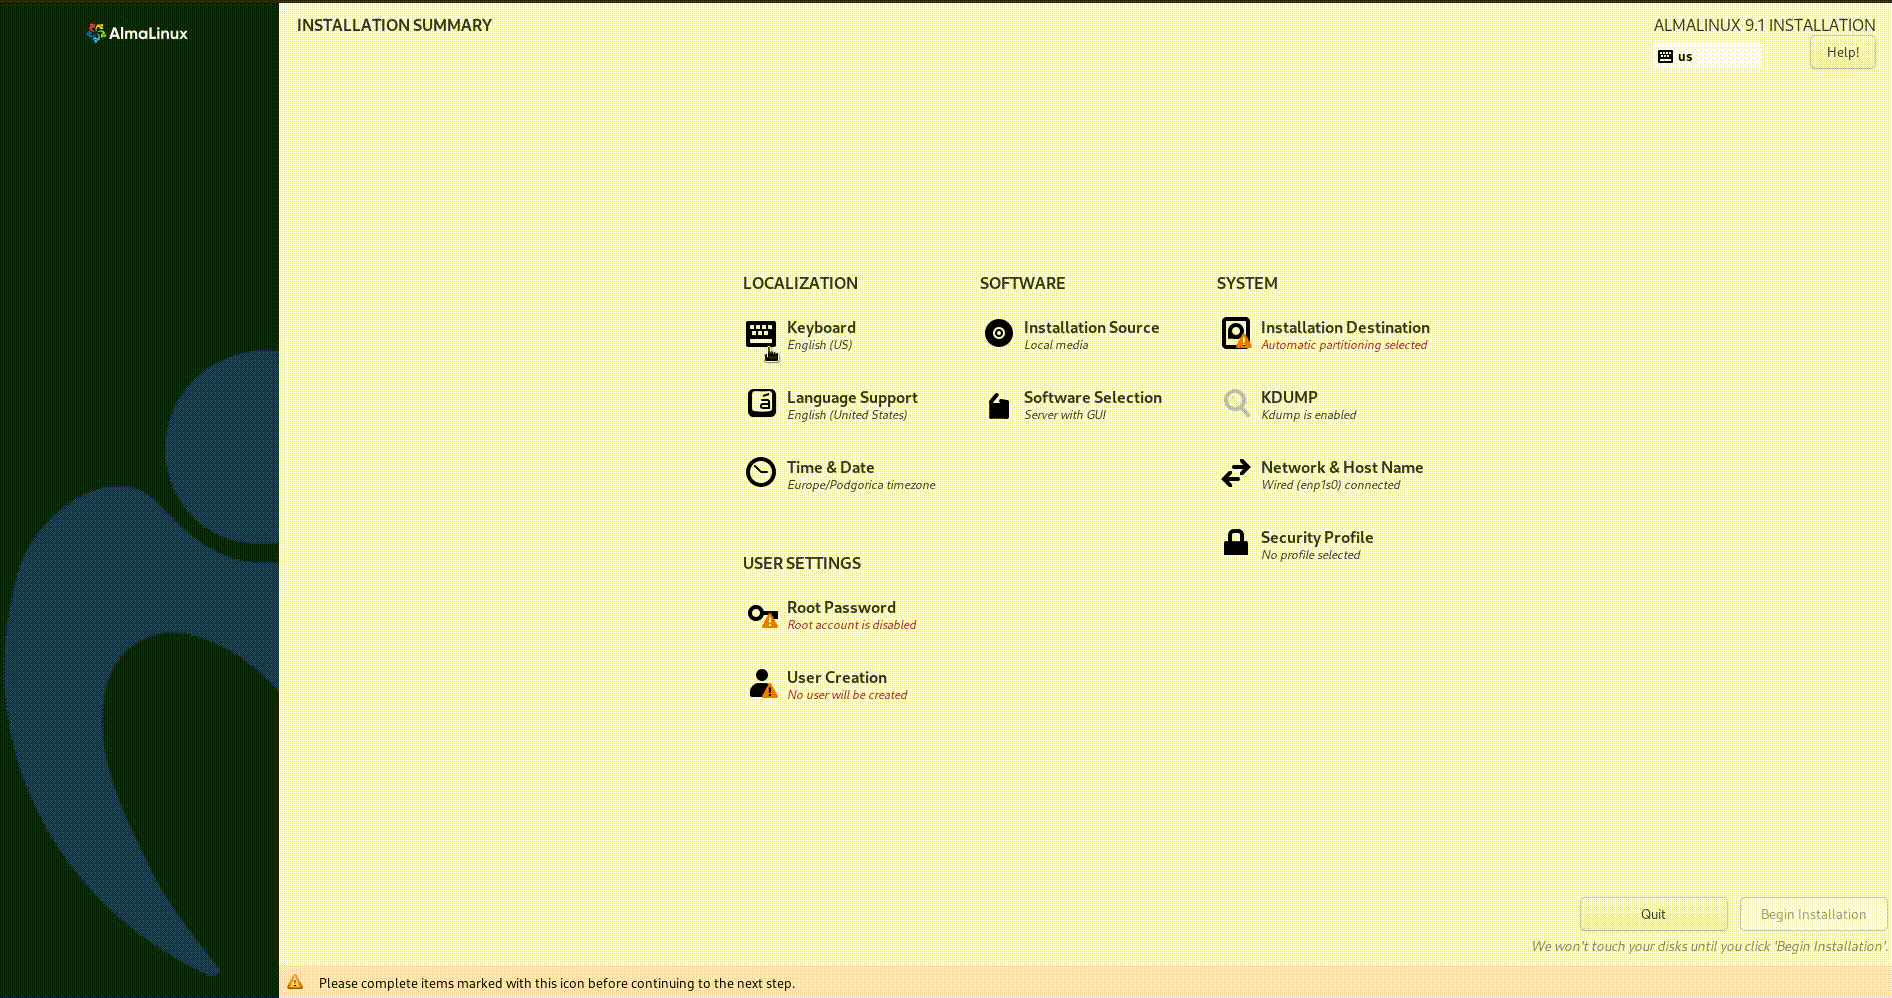
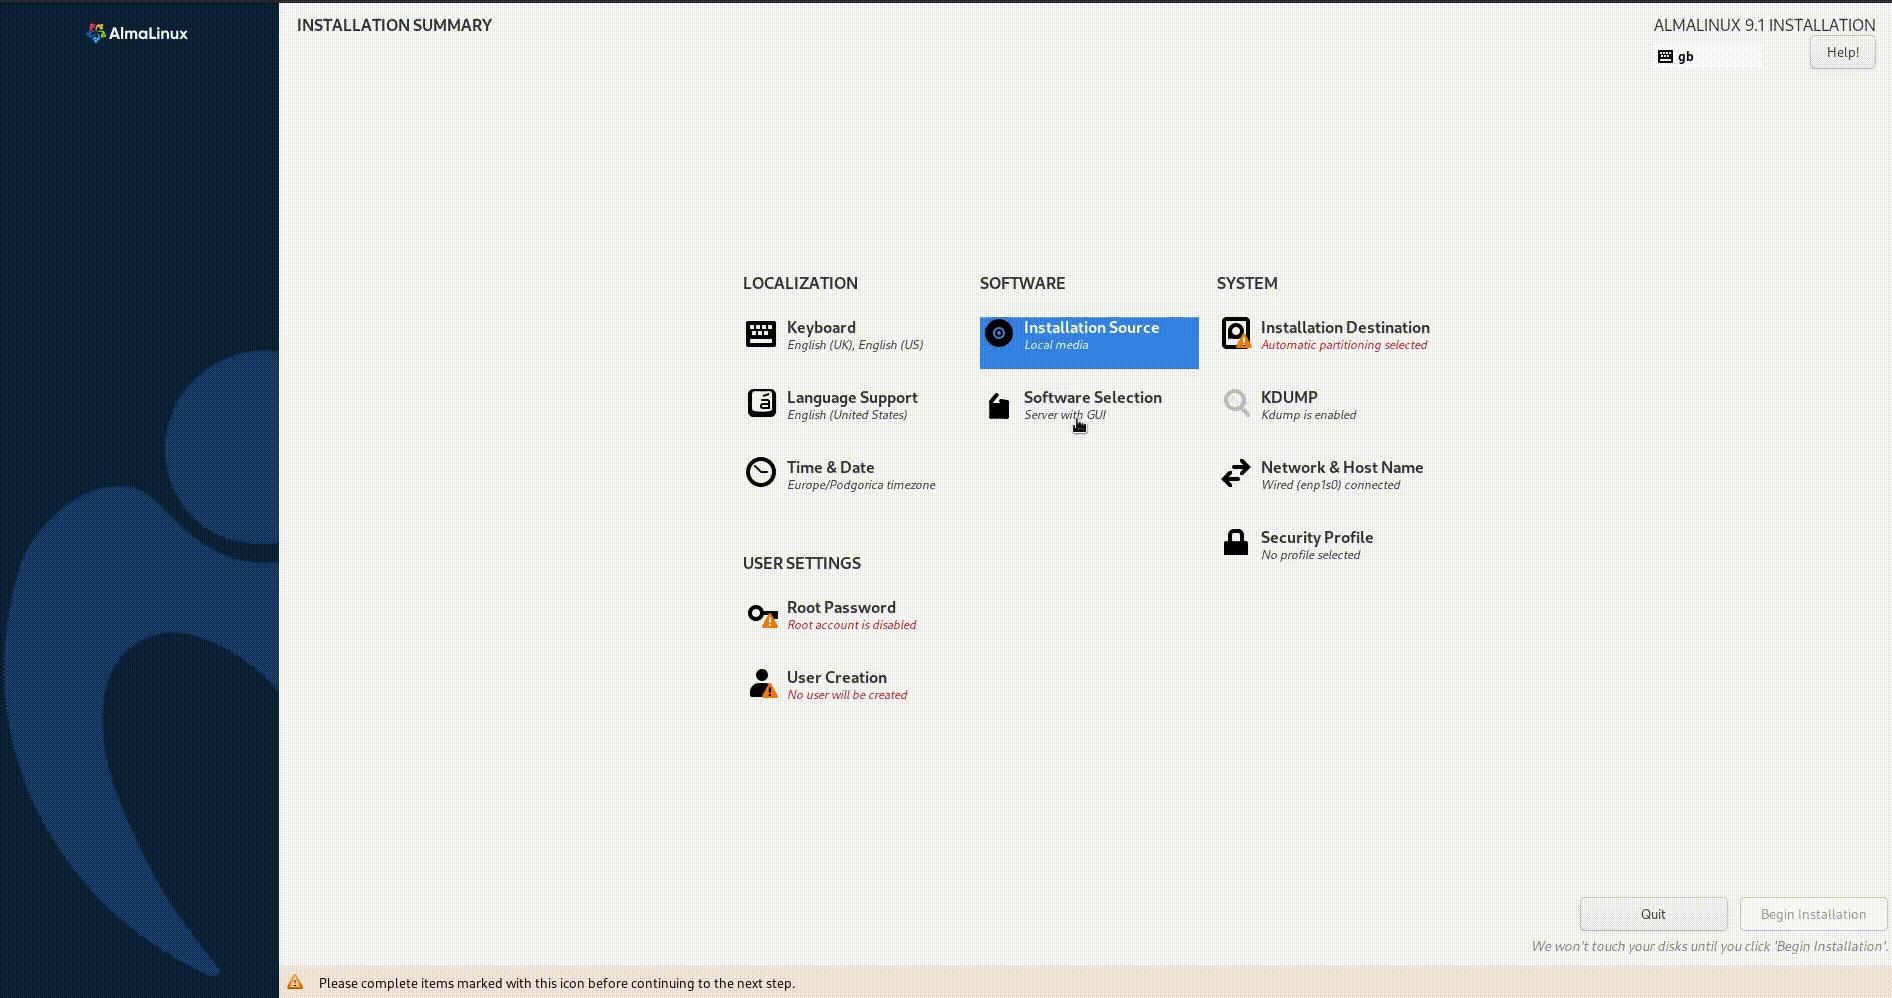
Next, the Installation Summary window will appear. It contains all of the sections that you can configure for the installation:

WARNING
Sections that are marked with red color are necessary to be configured to complete the installation.
# LOCALIZATION
Keyboard - you may specify the system's keyboard layouts here.
Select Done to complete the configuration of this section.
Language Support - the default supported language is the language selected for the installation process. You can add support for additional languages as required.
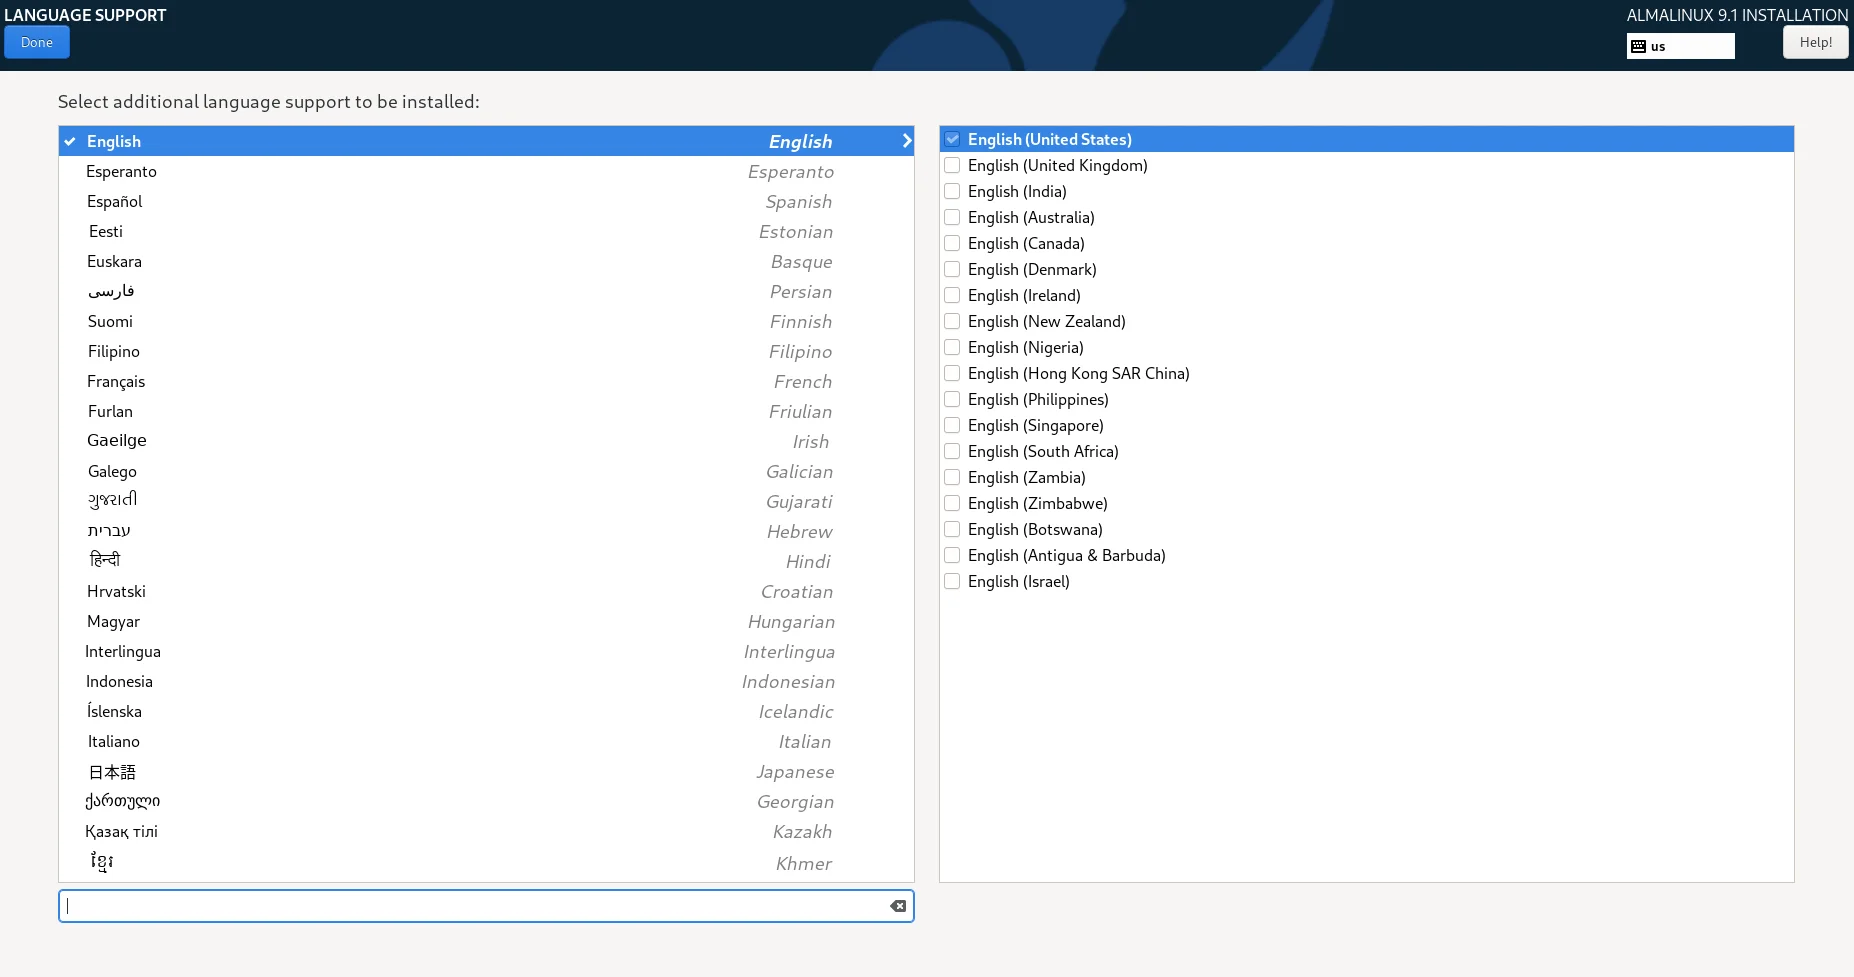
Select Done to complete the configuration of this section.
Time & Date - this option allows you to select the timezone to be configured. You can select the location from the Region/City lists or select from the map. Enable the Network Time option to configure the system to automatically set the time on boot via NTP.
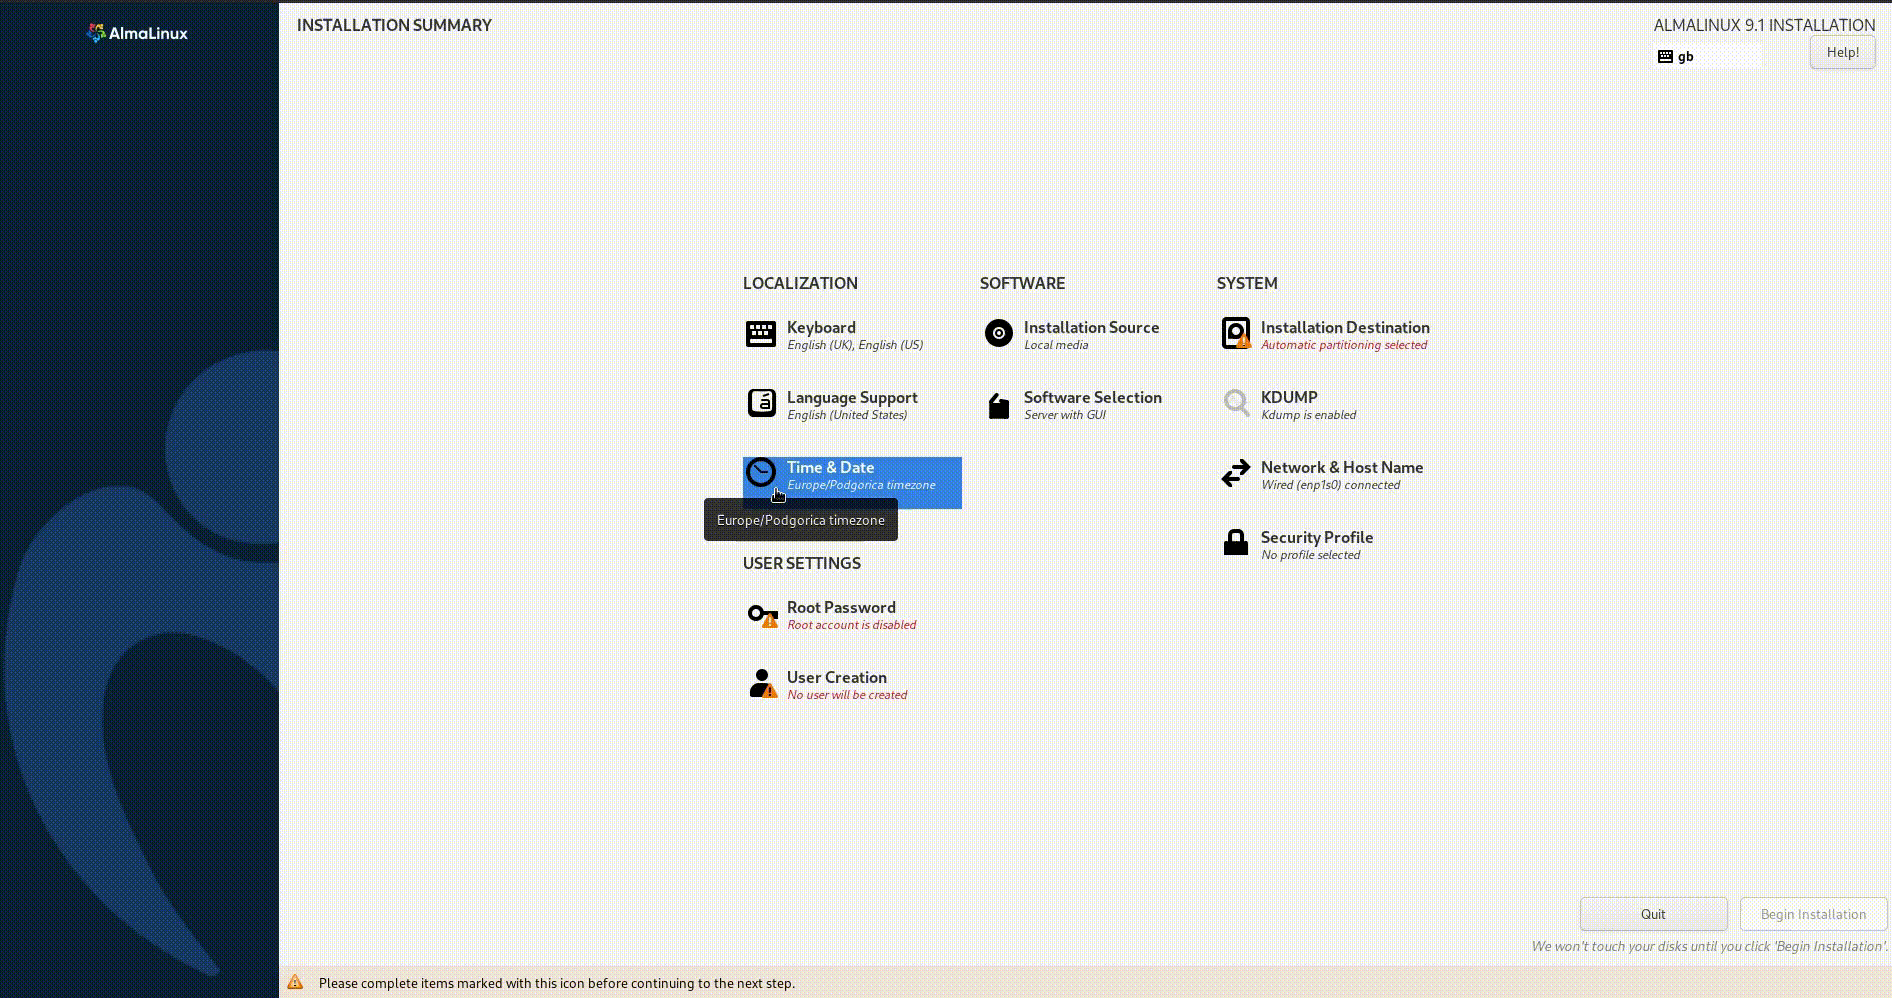
Select Done to complete the configuration of this section.
# SOFTWARE
This section allows you to add the installation source and additional repositories if needed.
- Installation Source - the installation source is to be specified here. When installing using the full DVD image the installation source will be automatically specified as Local media, if the Boot ISO is used as the installation media the installation source will be set to the closest mirror.
Select Done to complete the configuration of this section.
Software Selection - this section contains two fields:
- Base Environment - this field allows you to select the base packages for the installation based six pre-built definitions.
- Server with GUI
- Server
- Minimal Install
- Workstation
- Custom Operating System
- Virtualizaton Host
- Additional Software for the Selected Environment - here you can select additional software to be installed. The list of available additional software changes based on the chosen Base Environment.
Select Done to complete the configuration of this section.
- Base Environment - this field allows you to select the base packages for the installation based six pre-built definitions.
# SYSTEM
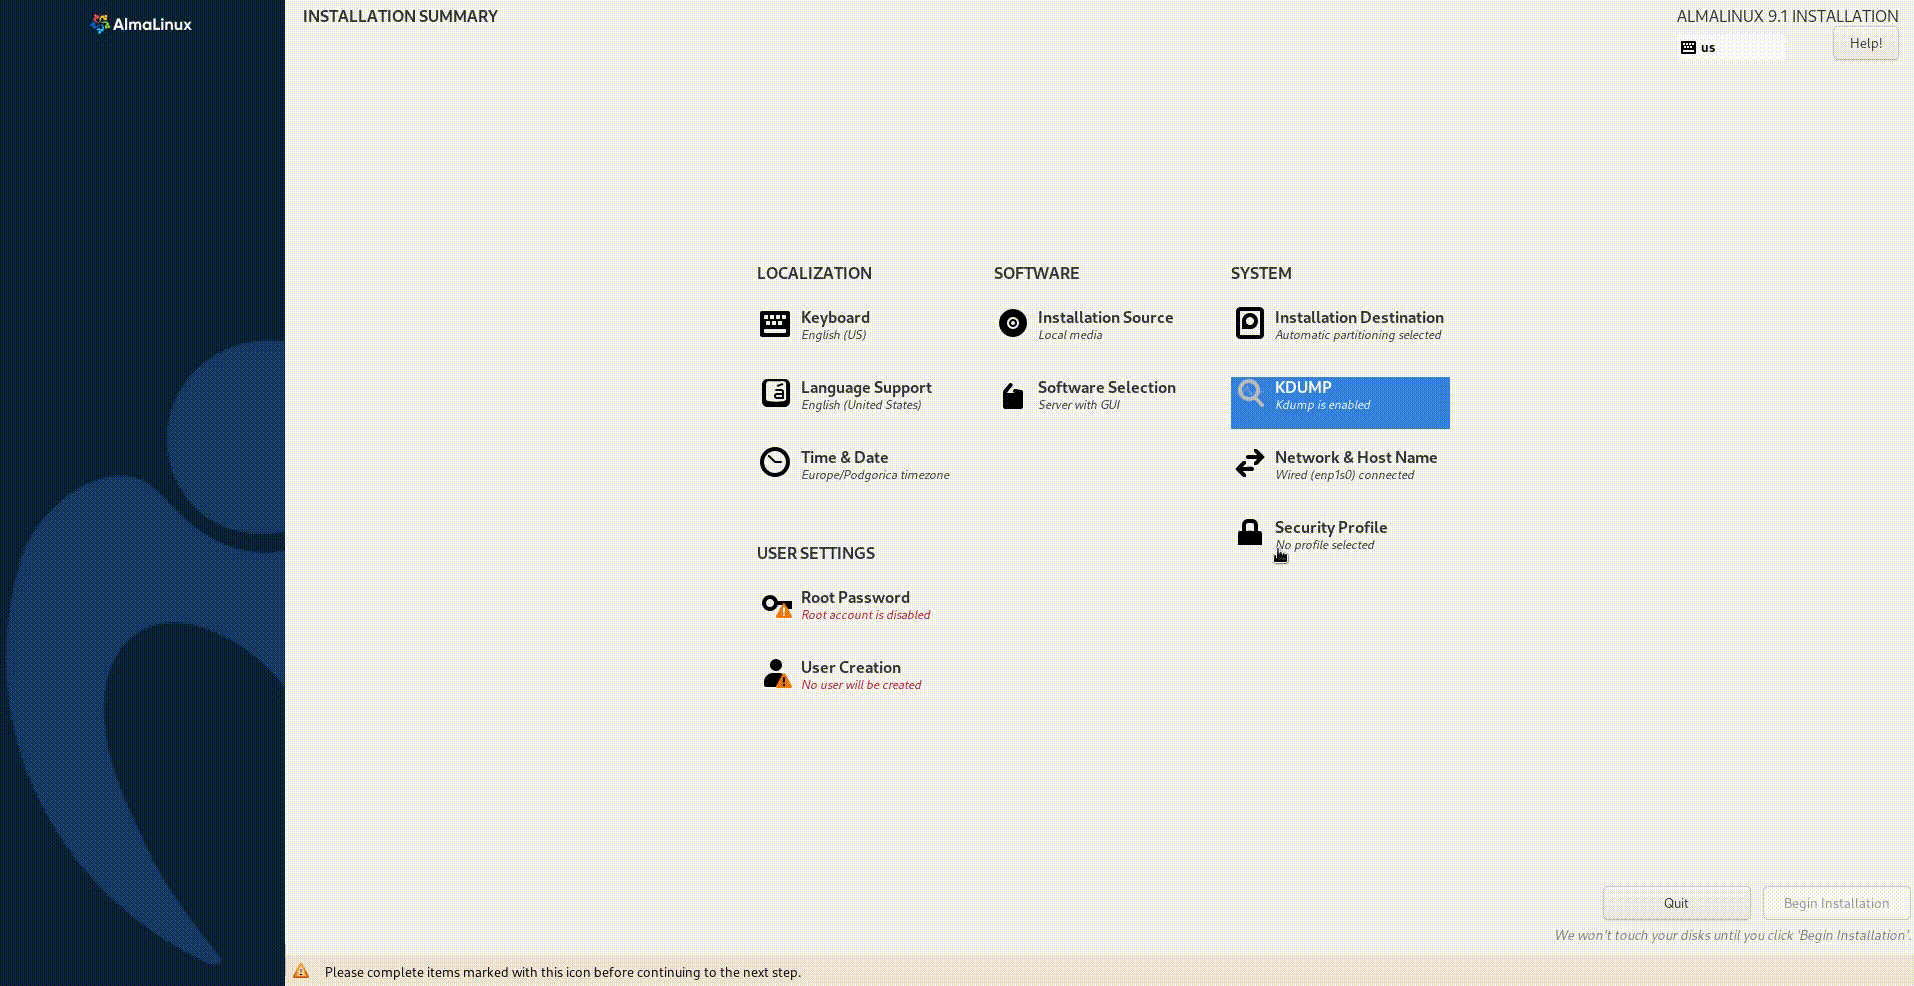
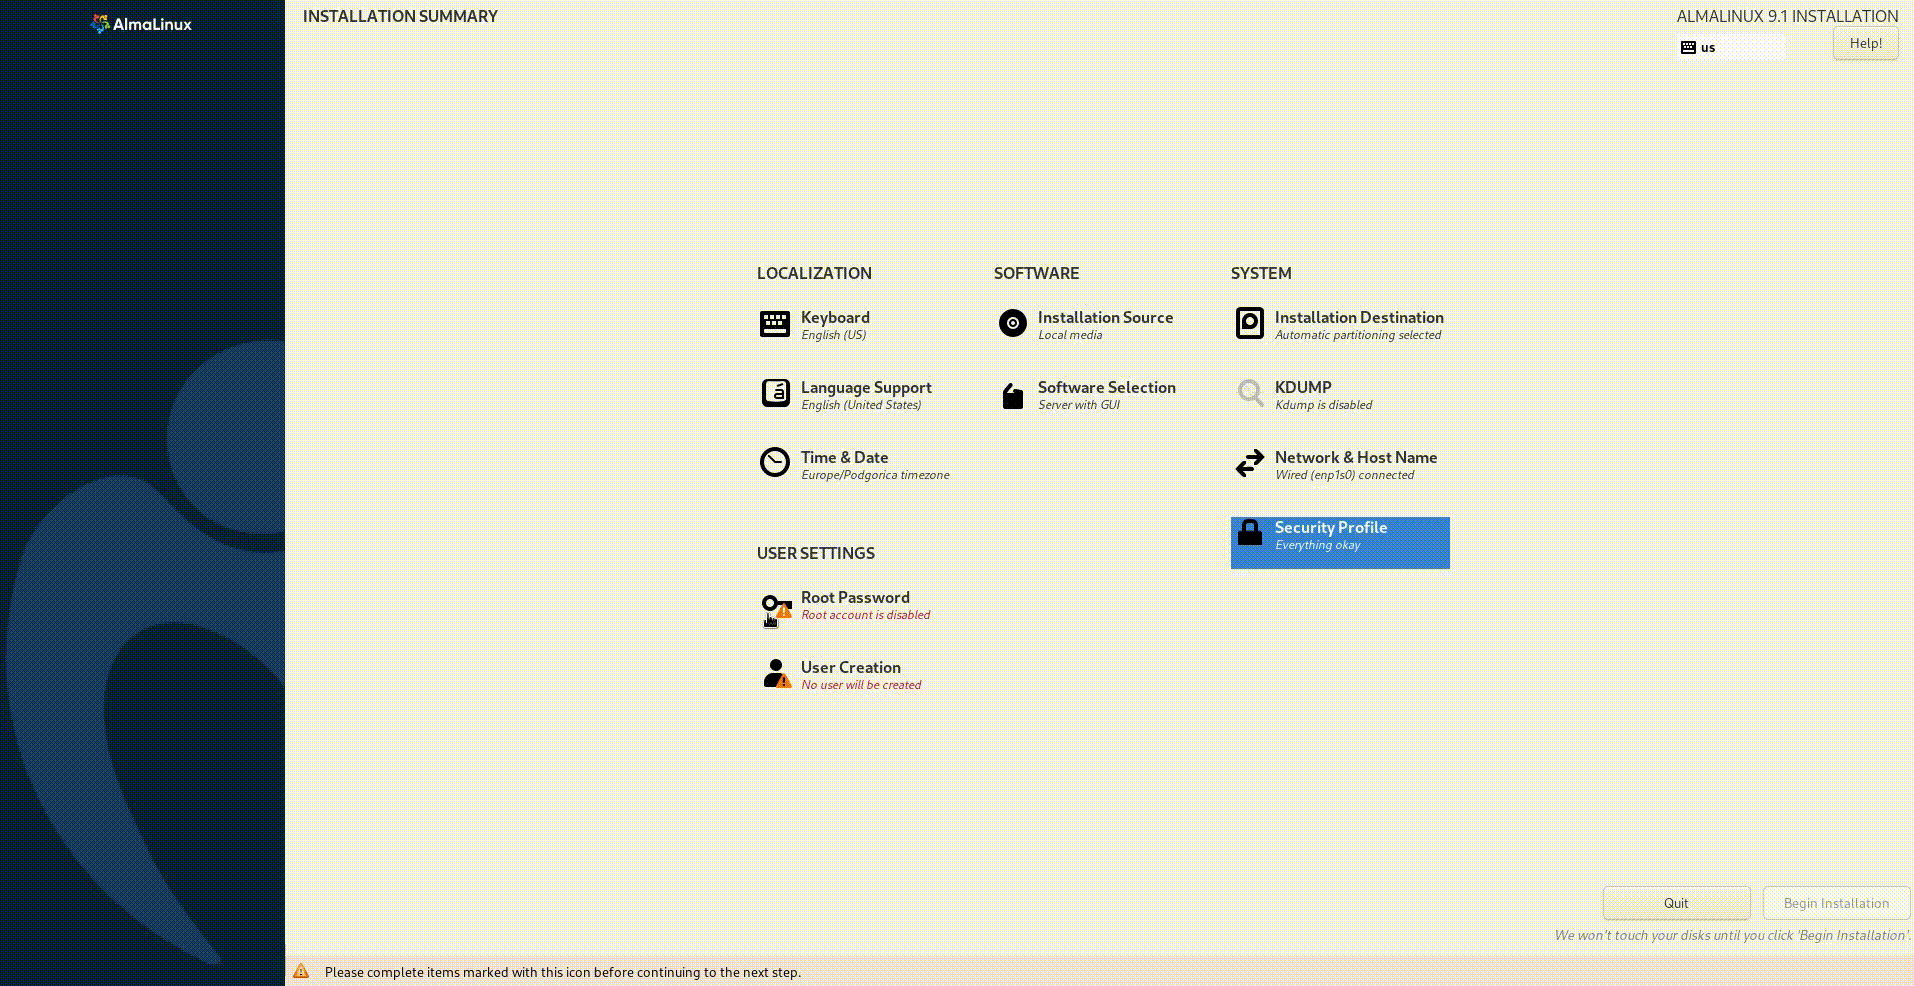
This section allows you to customize the installation to the requirements of your hardware, such as creating drive partitions, enabling storage encryption, KDUMP, specifying the Network and choosing a security profile:
Installation destination - available disks for the system installation will be shown as Local Standard Disks. If your system has only one disk, it will be automatically chosen. By default, Storage Configuration will be marked as Automatic.
TIP
To manually create disk partitions, select Custom.

TIP
To encrypt your data, select Encrypt my data and you will be asked to type a passphrase after clicking on the Done button.
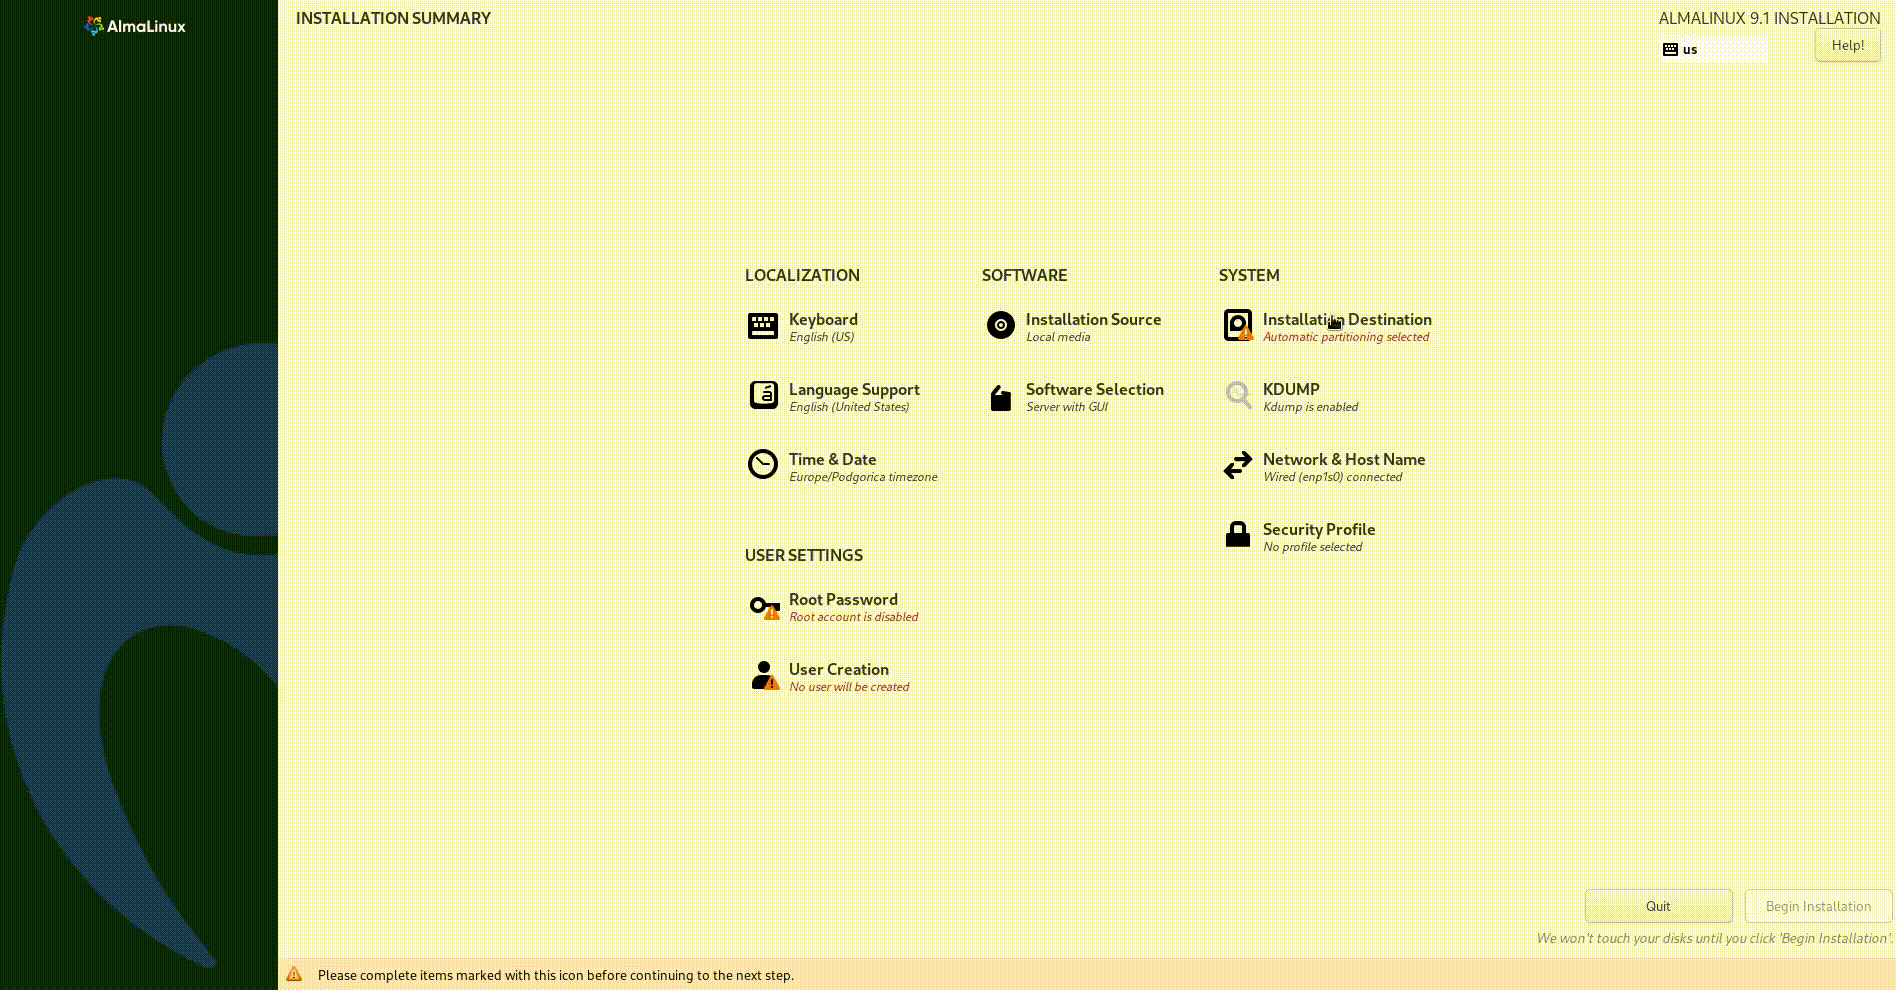
Select Done to complete the configuration of this section.
KDUMP - by default, kdump will be marked as enabled with automatic memory reservation.
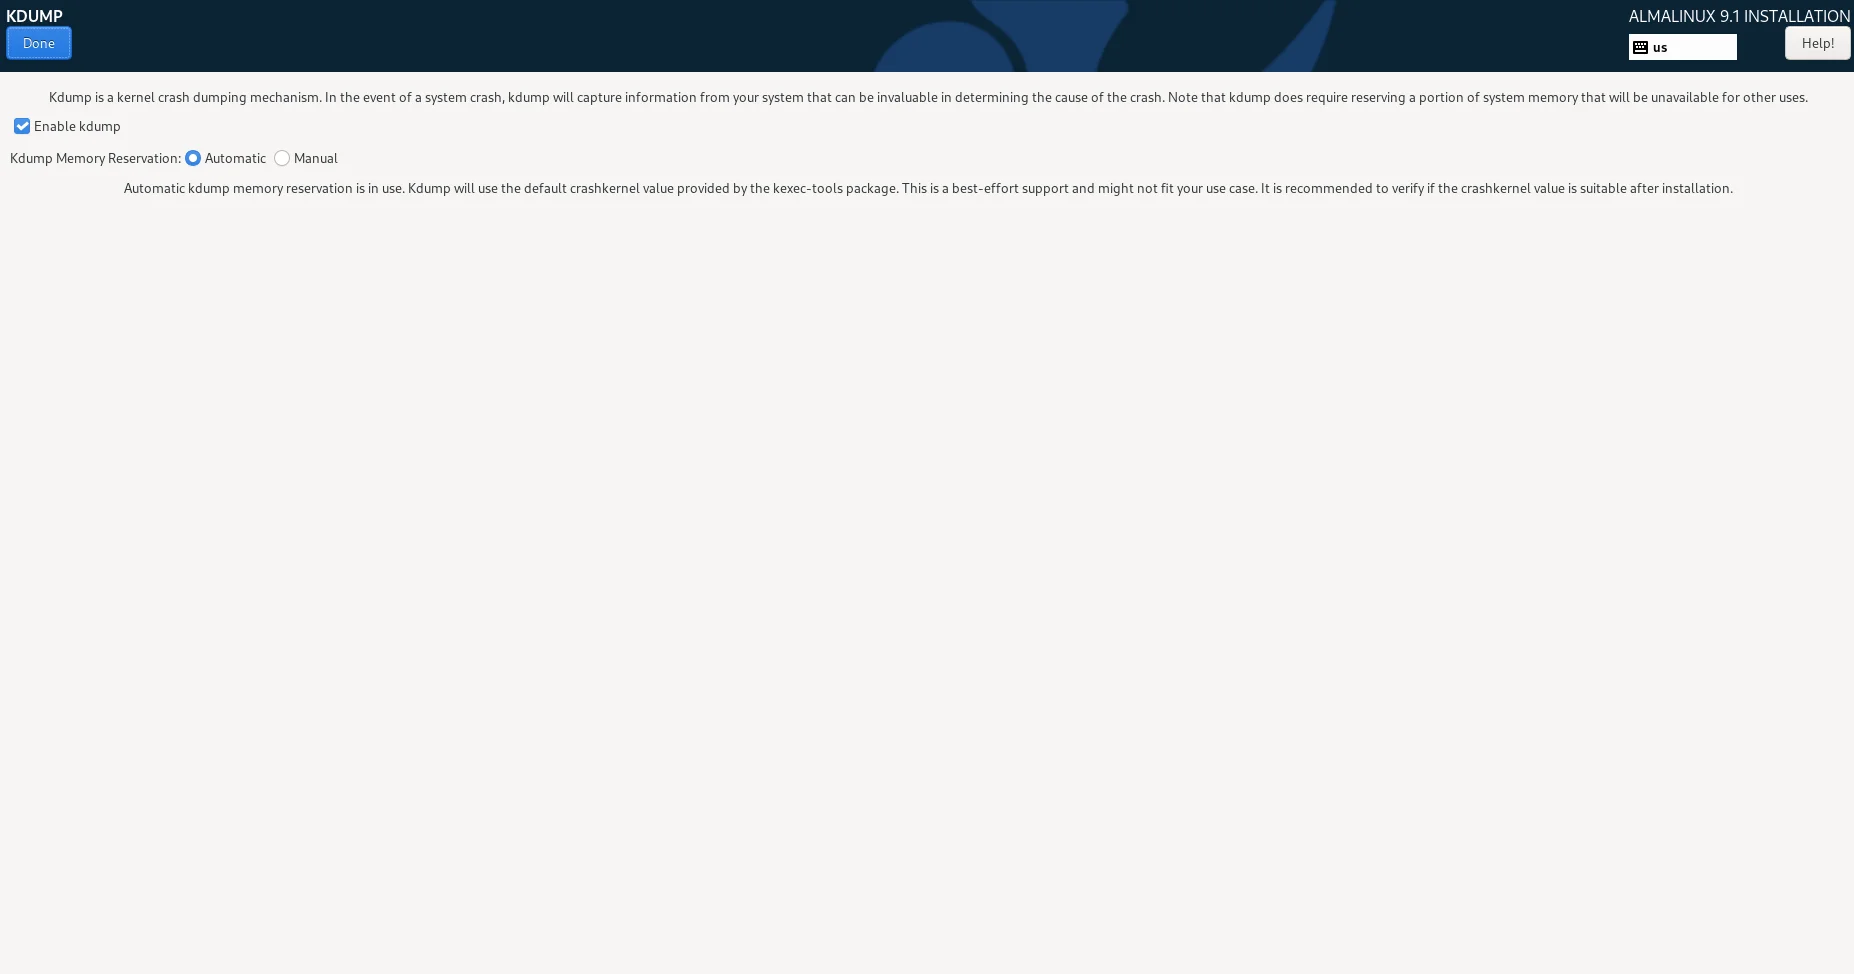
Select Done to complete the configuration of this section.
Network & Host Name - all detected networks will be listed in the left field. If able they will be automatically connected. You can add a network device and configure the chosen network in this section.

Select Done to complete the configuration of this section.
Security Profile - no profile is chosen by default, as applying a security policy is not necessary. The applied security policy will be installed in the system using the compliance policies defined by SCAP. You can choose one of the available security profiles:
ANSSI-BP-028 (enhanced)
ANSSI-BP-028 (high)
ANSSI-BP-028 (intermediary)
ANSSI-BP-028 (minimal)
[DRAFT] CIS AlmaLinux 9 Benchmark for Level 2 - Server
[DRAFT] CIS AlmaLinux 9 Benchmark for Level 1 - Server
[DRAFT] CIS AlmaLinux 9 Benchmark for Level 1 - Workstation
[DRAFT] CIS AlmaLinux 9 Benchmark for Level 2 - Workstation
[DRAFT] Unclassified Information in Non-federal Information Systems and Organizations (NIST 800-171)
Australian Cyber Security Centre (ACSC) Essential Eight
Health Insurance Portability and Accountability Act (HIPAA)
Australian Cyber Security Centre (ACSC) ISM Official
[DRAFT] Protection Profile for General Purpose Operating Systems
PCI-DSS v3.2.1 Control Baseline for Red Hat Enterprise Linux 9
[DRAFT] DISA STIG for Red Hat Enterprise Linux 9
[DRAFT] DISA STIG with GUI for Red Hat Enterprise Linux 9
TIP
For further details about Security Profiles, check the OpenSCAP Guide for AlmaLinux 8 and OpenSCAP Guide for AlmaLinux 9.
Select Done to complete the configuration of this section.
# USER SETTINGS
This section allows you to configure a password for the root user account if required and create user accounts.
Root Password - the root user is the most privileged account, a strong password is highly recommended to protect this account. Type the password in the Root Password text field and type it once more in the Confirm text field to confirm the password.
Select Done to complete the configuration of this section.
User Creation - this window allows you to create administrative and non-administrative users. To create a user fill in the Full Name and User Name fields, set and confirm the password, and enable the Make this user administrator field if required. The Require the password to use this account option is enabled by default. You can leave it enabled or click on the checkbox to remove the check to disable this option.
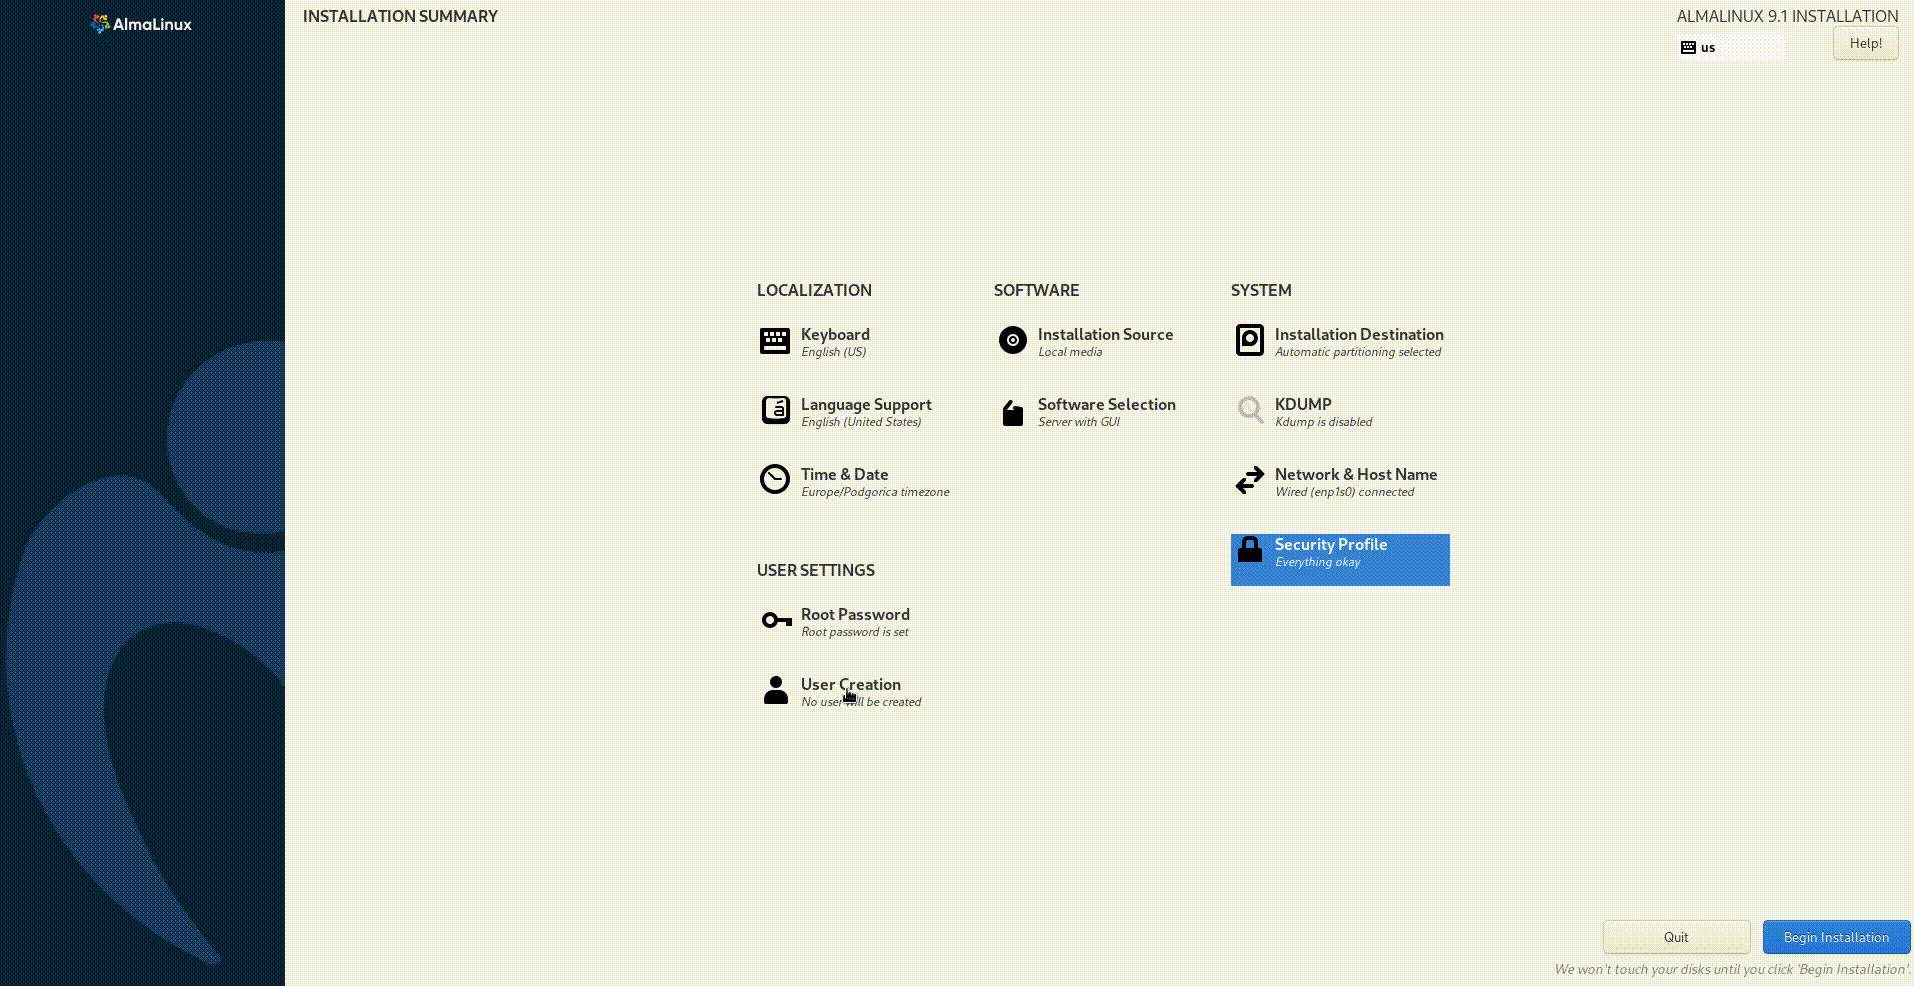
Select Done to complete the configuration of this section.
When you are finished with the customization, click on the Begin Installation button to start the installation process.

The installation will begin and the progress shown on the Installation Progress screen.
TIP
If you don't want to proceed, you can safely quit the process by pressing the Quit button or resetting the machine.
Wait for the installation process to complete successfully and click on the Reboot button to restart the system.
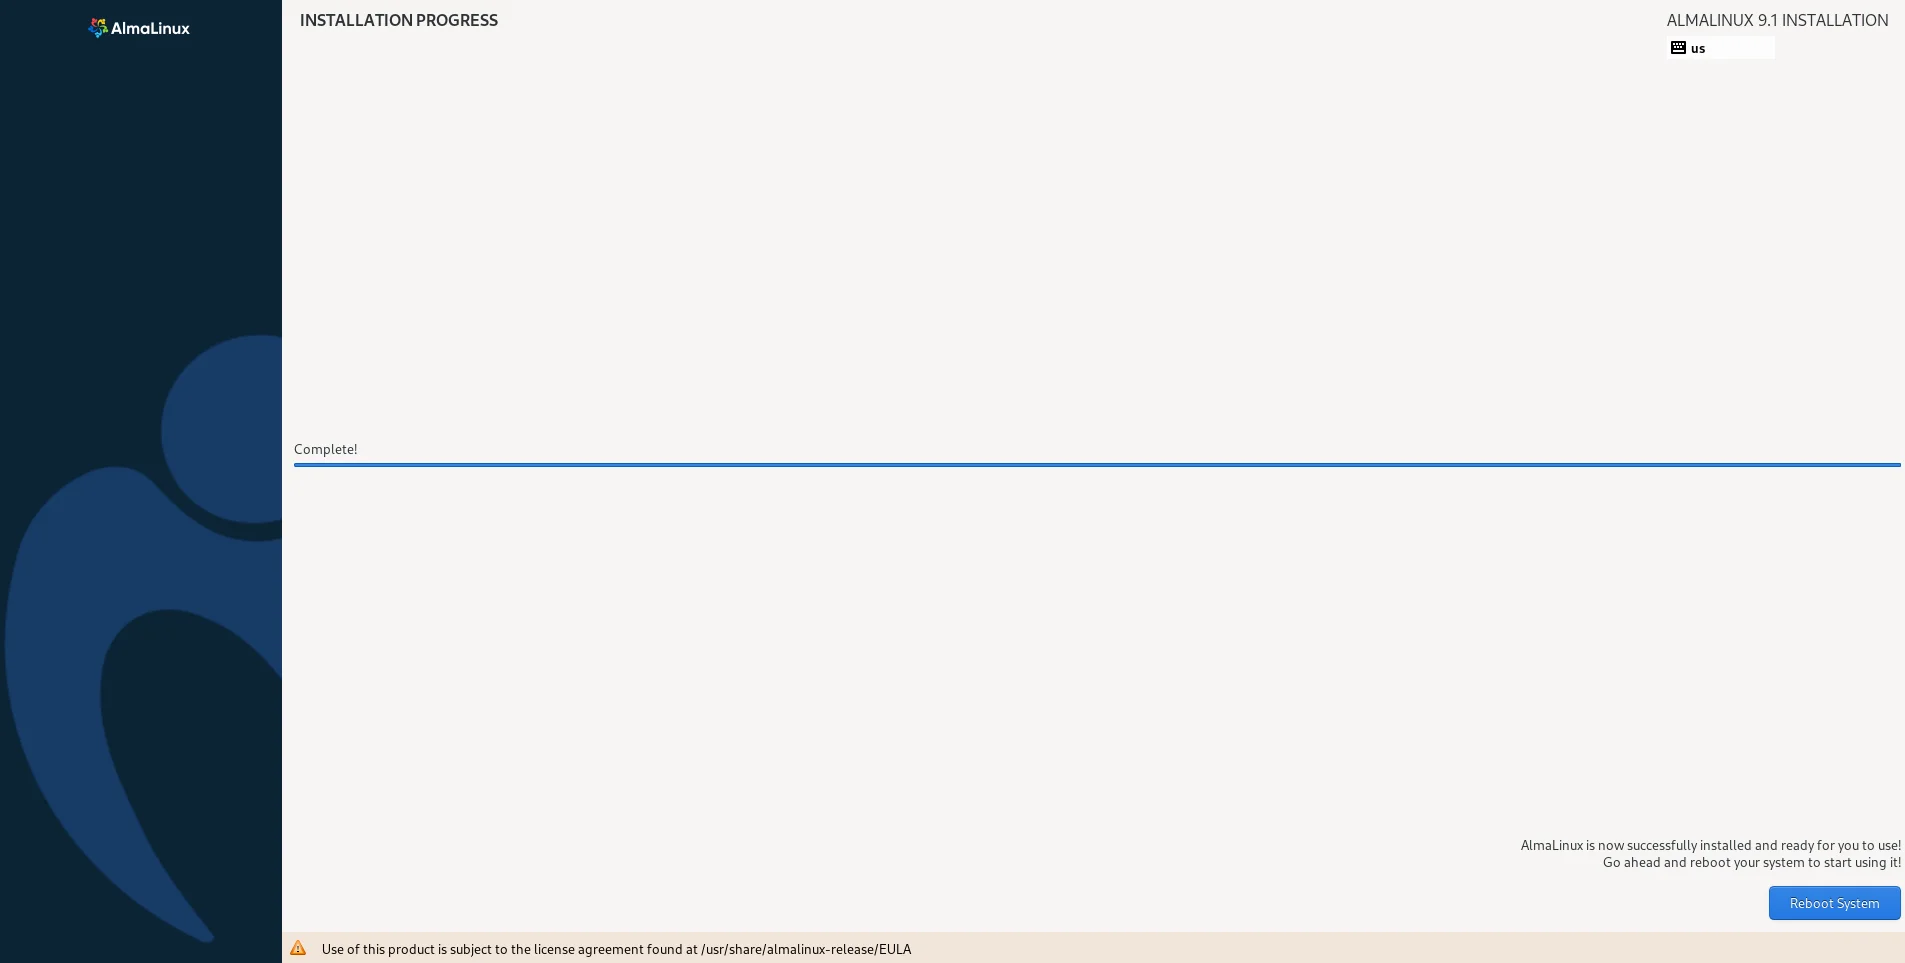
When the system reboots, log in and enjoy your AlmaLinux system.
# Live Media
AlmaLinux also provides Live Media images with different desktop environment options:
- GNOME-Mini
- GNOME
- KDE
- XFCE
- MATE
Using Live Media you can try AlmaLinux OS before installing or install AlmaLinux with a different desktop environment than the standard installer provides. You can find more information on the Live Media wiki page.
# Trademark notices
Red Hat, Red Hat Enterprise Linux are trademarks or registered trademarks of Red Hat, Inc. or its subsidiaries in the United States and other countries.
Linux® is the registered trademark of Linus Torvalds in the U.S. and other countries.
macOS is the registered trademark of Apple Inc. in the U.S. and other countries.
Windows is the registered trademark of Microsoft Corporation in the United States and other countries.